GM2 Sounds
I. VR: the two Sound engines: ‘Keyboard engine’ and ‘GM2 engine’
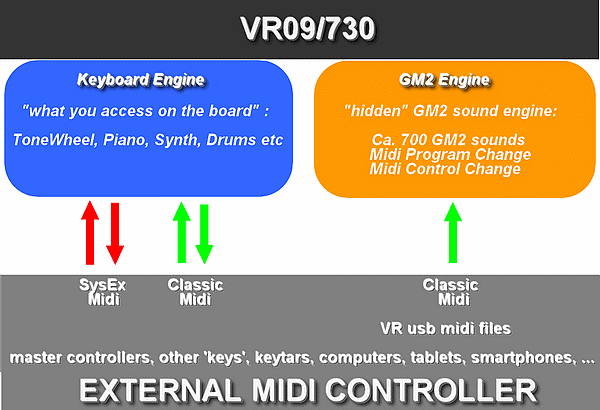
The VR has two distinct ‘sound engines’:
- the VR Keyboard Engine: this is the sound engine that you access on the VR front panel (Tonewheel, piano/synth-sounds, DRUM section etc) – it’s what you normally use when you play the VR.
- the VR GM2 Engine: this is an additional ‘hidden’ sound engine with ca. 2000 ‘hidden GM sounds’. There are several ways to access and perform the GM2 sounds:
- control of the GM engine with external midi gear: midi/master controllers, sequencers, computers, etc
- load GM2 sounds into the keyboard engine and play ‘on VR keys’ by using the ‘VR Juno-Gi midi-sysex-layer’ (requires CTRLR V-Combo Editor)
- some ‘tricks’ to access the GM2 sounds by the VR using ‘midi loopbacks’
The GM2 engine is also used by midi song files played from a VR usb-stick.
II. The ‘GM2 engine’
‘General Midi’ (‘GM’) is a midi specifiation standard. For example, GM contains 128 ‘standardized sounds’ (natural instruments, synth sounds, effect sounds…) and a handfull of ‘midi controllers’ (e.g. ‘volume’, ‘sustain’, etc)
‘General Midi 2’ (‘GM2’) is the extension of GM (mainly pushed by Roland corp). GM2 contains 256 ‘standardized (Roland) sounds’ and a lot more ‘midi controllers’ (e.g. pitch bend, envelope and filter, vibrato, etc etc) for heavy modifying of sounds
Beyond this ‘standard’ the GM2 engine included in VR offers A LOT more:
- a total of ca. 2500 (!) sounds:
- ALL sounds of VR ‘keyboard engine’ : the official VR sounds (including ‘VR730 exclusive’ sounds), hidden ATELIER sounds, hidden ‘extra’ sounds
- official “VR-GM2 sounds” (listed in the VR09/730 midi implementation manual)
- official “ATELIER-GM/GS sounds” (listed in the ATELIER organ midi implementation manual)
- the (nearly) complete sound set of the Roland Expander SoundCanvas 8850
- GM2 ‘Control Changes’ and GM2-Effects:
- the standard GM2 midi controllers (Control Changes, Pitch bend, etc) for modifying the sounds in a live performance
- GM2-Effects: VR Reverb, a classic Roland Chorus, a Sustain-effect, Vibrato (Rate/Depth/Delay), Glide-effect, Growl-effect etc
- for an overview of all controllers and effects see VR Classic Midi)
|
NOTE: ‘Midi song files’: Midi (SMF) song files (e.g. for Karaoke) are based on the GM-standard. If you replay a ‘3rd party’ midi song file from VR usb drive, it interacts exclusively with VR GM2-engine (using the 128 GM standard sounds and GM controllers). With a midi editor (e.g. freeware ‘MidiEditor’, midi editor of your DAW, etc) you can create your own midi songs (accompaniment), including all 2500 GM sounds and VR GM-effects (to run in VR the midi/smf file must be of ‘SMF format 1’) |
III. How to find & select the GM2 sounds on the VR:
(A) CTRLR V-Combo Editor:
The most comfortable way is to use the CTRLR V-Combo EDITOR: it has a ‘SOUND-GM2’ section that allows to load any GM sound into either ‘VR keyboard-engine voices’ or ‘GM2-engine midi channels’ and has ‘controllers’ for modding the sounds. In the Editor, switch to panel ‘SOUND’, then [SOUND-GM2] Tab and select the ‘SOUND ENGINE’
Let’s emphasis: GM sounds CANNOT be saved in VR registrations: either you use ‘ctrlr editor MidiMapper’ (live) or progamm the sounds (bank/pc) in an external midi controller:
| function | KBD ENGINE | GM2 ENGINE |
| where GM2 sounds are loaded to: | VR ‘keyboard voice’ | GM2 engine channel |
| how GM2 sounds are played: | VR keybed | external midi gear or VR keys by ‘loopback tricks’ |
| how GM2 sounds are modified: | VR keyboard controls (VR or CTRLR EDITOR) including EFX | GM2 standard control changes |
| can GM2 sounds be saved directly to VR registrations: | no | no |
| can VR registrations be ‘misused’ to load GM2 sounds: | yes: by ‘computer software’, e.g. CTRLR EDITOR has a ‘Midi-Mapper-action’ for this purpose | yes: e.g. by CTRLR EDITOR MidiMapper. To load one GM2 sound ‘by a VR registration’ one can use the ‘ring trick’ |
(B) Using sound lists to programm midi keyboards or own software (DAWs, keystage):
Download file VR_GM2_soundlist.zip and uppack the archive. The files contain all GM sounds with their bank/program numbers (msb/lsb/prg)
IVa) Perform GM2 sounds in the ‘keyboard engine’
This is probably the most easiest way to perform GM2 sounds but requires to run CTRLR EDITOR as a ‘live utilty’ during the performance.
CTRLR EDITOR allows to ‘upload’ GM2 sounds into the VR keyboard engine
You can either load GM2 sounds manually using [SOUND-GM2] tab of EDITOR or use the ‘MidiMapper’ to automatically load a GM sound when a VR registration is recalled.
Both methods allow to apply the complete set of VR ‘keyboard controlers’ (filters, envelopes, EFX, portamento, sustain, etc etc- short: all the knobs you can wobble on the VR board or in the EDITOR – and which can be saved to a registration).
IVb) Perform GM2 sounds in the ‘GM2 engine’
Using GM2 sounds with the GM2 engine also requires additional “gear”: a 2nd ‘midi keyboard’, a computer running a DAW, a midi-router or CTRLR EDITOR, an external sequencer etc. Or you can plug a midi cable from VR midi out to midi in and send program data and key on/off from the VR keyboard to the GM2 engine (see below and read the WARINGS)
| Important: the number of channels available in ‘GM engine’ depends on VR ‘Midi Mode’ (Setting in VR menu “Midi”): Midi Mode 1: all 16 channels are available for GM engine Midi Mode 2: GM engine is limited to channels 5-10, 12, 14-16 (other channels are reserved for VR keyboard engine) Midi Mode ‘Keyboard’: GM engine is not accessible (as all incoming midi-data is send to keyboard-engine lower manual |
Methods to load GM sounds into the GM2 engine:
- use EDITOR for VR factory GM sounds or a prepared ‘editor GM presets’. This allows layering of GM sounds
- use an external keyboard (midi controller) that is capable of sending bank select + program changes for GM2 sounds
- use a VR registration to load a GM sound with aid of a ‘midi bridge’: Only one GM sound can be loaded at a time
To play GM sounds there are several methods
- playing on the VR key by attaching a tablet/laptop running a ‘midi router software’ that routes VR notes back to its GM banks. This will allow layering GM sounds.
- playing on an external keyboard (midi controller) attached to the VR: depending on the controller you can layer GM sounds and/or use zones
- playing on the VR key by using a ‘midi bridge cable’ and sending proper notes back to its GM banks. This will allow only ONE GM sound (no layering)
Using VR registrations for loading GM2 sounds (DELICATE !)
We’ll discribe the ‘VR registration method’ for sound loading and the ‘midi bridge cable’ for playing on the VR as this can be used ‘on stage’ without additional gear (tablets, laptops, midi keyboards etc):
The VR registration program changes can be used to load a GM2 sound to the VR. For this purpose, the VR needs to send the program changes ‘to itself’. This is possible by:
a tablet/laptop and a ‘midi-router’ software
the ‘midi bridge’ cable between VR MIDI OUT and IN
The loaded sound can then be played by on the VR keyboard itself. With other words: you can prepare ‘registrations with a GM sound’ and use them on stage
Midi Router software
Windows & Mac: a mighty (free) software is “TransMIDIfier”: it can re-route any channel, filter midi messages etc. “CopperLan” also provides re-routing
Android: ‘Midi Commander’ (by Bordero), ‘Midi Keyboard’ (by Dreamhound)
IOS: Keystage, Midi-Flow, etc
The midi bridge ‘ring trick’
or: how to play a GM2 sound without external gear 🙂
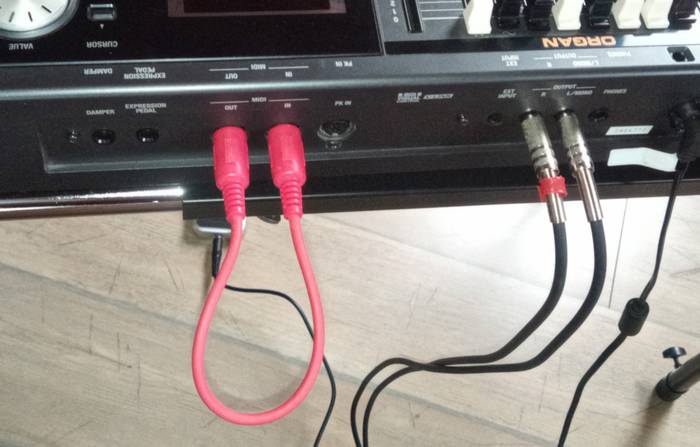 |
The Trick is to plug a 5-pin midi cable from VR midi-out to midi-in (the ‘ring’ – or ‘bridge’). This will enable you to:
|
| WARNING 1: As long as the midi bridge cable is connected, the keybed will send midi notes to the ‘TX’ channel of the manual. Switching to another registration with default TX channels (e.g. channel 4 for upper manual) will result into ‘double-playing’ of the VR manual sound. The trick is to set the TX channels of ALL non-‘GM2’-registrations to the ‘deaf’ control channel 16 with the VR being in Midi ‘Mode 2’ or ‘keyboard’ (Channel 16 does not receive midi note messages) |
| WARNING 2: As long as the midi bridge cable is connected, the usage of Expression Pedal is not allowed! It instantly causes a permanent disruption of any sound and the VR has to be rebooted. |
(A) AT HOME: prepare the VR registration using the editor
Before first use of ‘VR GM registrations’ all TxMidi Channels for all registrations must be set to ‘dead channel 16’: TX (‘transmission’) midi channels are the channels on which the VR sends midi note on/off messages through its midi out jack.
With the bridge cable in place, the VR will send note on/off signals to itself
This means that registrations with default TxMIDI channels (e.g. channel 4 for upper manual) will receive the same note on/off twice (directly from keybed + via bridge), re-triggering each note and resulting in awful sound artefacts.
To avoid this all non-GM-registrations have to be modified by setting the TX channel of each manual to channel 13.
In MIDI MODE 2, channel 16 is a ‘dead channel’ and all note on/offs send to it end in Nirvana.
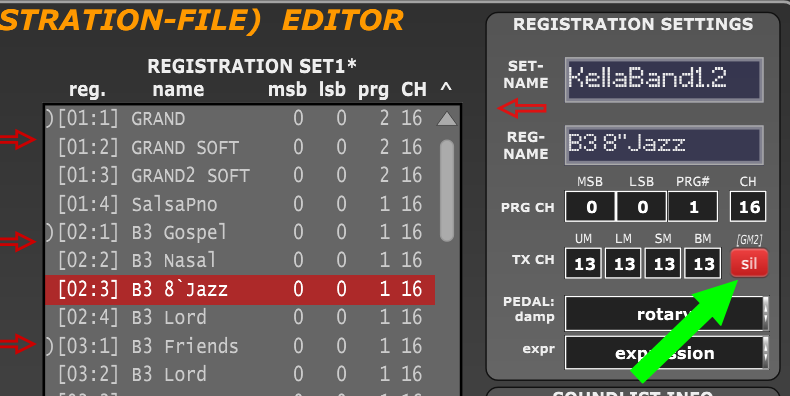
You can change all registrations by hand using the VR-menu ‘MIDI’ – or use the CTRLR EDITOR special feature introduced in version v1.12.12: export your registrations to an upg-file, load the file to the EDITORs ‘upg editor’ tab, treat each registration with the new ‘[GM2] sil’ button, save the file back and reload it into the VR (this might sound complicated but it’s done in 10 minutes)
- prepare the VR:
– connect its midi-out to its midi-in jack with a 5-pin midi cable
– open VR-menu ‘MIDI’:
set ‘MIDI IN Mode’ to MODE 2
set TxMIDI Channel of the manual you want to use for the GM sound to a channel ‘C’ of your choice
C must be 5-10,12,14,15. Channel 10 is reserved for ‘GM drums’
– mute the keyboard sound by the ‘parts volume knobs’ - Now look for a nice GM sound:
If you can use CRTLR V-Combo EDITOR (e.g. Windows and Mac users):
– connect editor and VR, switch to SOUND-EXPLORER tab ‘[GM2]’, set Midi-Mode 2 and SEL-ect channel ‘C’
– Load GM-sounds to channel ‘C’. You can test the sounds by playing on the VR
– If you found a nice sound note down its PRG MSB LSB values shown on the [GM2] LCDIf you cannot use CRTLR V-Combo EDITOR (e.g. IOS users):
– fetch VR midi manual, goto GM sound list with program numbers and msb-lsb bank select
– use a midi app to send PC#/MSB/LSB of a sound to channel ‘C’. Test the sound by playing on the VR
Important: The ‘program numbers’ (PC#) in the VR manual are listed in ‘1-128’ counting scheme.
If your midi app uses ‘0-127’ counting scheme, substract 1 from the values given in the manual - Open VR-menu ‘MIDI’:
set ‘Send PC Switch’ to ON
set ‘PC Number BankMSB’ to the MSB value of the GM sound
set ‘PC Number BankLSB’ to the LSB value of the GM sound
set ‘PC Number PC Num ‘ to the PRG value of the GM sound + 1 (e.g if PRG is ‘6’, PC Num must be set to ‘7’) - Save to a registration
(B) ON STAGE:
- On VR, connect its midi-out to its midi-in jack with a 5-pin midi cable (see picture)
- Load the ‘prepared’ VR registration: it will send the registration program change to channel C loading the GM-sound and set the TX channel of the keybed to C
- Play 🙂