VR ‘MODE’ (One Touch)
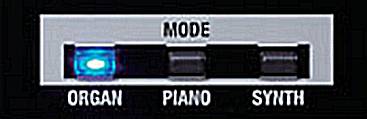
In this article we explain how the MODE buttons can be used to quickly switch between different sounds during a performance (instead of e.g. changing registrations)
(I) Understanding the “MODE” (or “One-Touch”) buttons
(IIa) Preparing VR Organ for MODE ORGAN button
(IIb) Preparing VR Piano or Synth sound for MODE PIANO/SYNTH button
(III) Using the MODE buttons with VR registrations
(IV) Using the MODE buttons with VR registrations and V-COMBO EDITOR
(IV) Remarks
(I) Understanding the “One-Touch” (or “MODE”) buttons
The common understanding is that the MODE buttons recall ‘fixed factory settings’ for organ, piano, synth.
But this not true! While pressing MODE buttons resets certain VR settings to ‘factory default’ other settings preserve their ‘current values’
Examples:
– PIANO button does NOT force back to ‘GrandPianoV’ but to the last chosen piano or EP
– ORGAN button preserves its currently selected ‘organ type’ and drawbar setting (plus more settings)
VR MODE buttons are ‘a little bit’ comparable to (former) Nord Electro “Live mode”
prepare ‘settings’ for MODE buttons : live of via VR Registrations
The settings for ORGAN, PIANO and SYNTH can be changed while you play on VR – or by loading a VR registration: registrations can be used to ‘prepare’ MODE buttons.
Example: during a song, you want to switch between an Electric Piano and Jazz-Organ:
“normally’ one would use 2 registrations: one with Jazz-organ, one with EP – but you can pack both ‘sounds’ into to one registration and use the MODE buttons to switch
This technique has advantages and ‘limitations’:
Advantages of using MODE buttons:
– instead of ‘wasting’ 2 or 3 VR registrations for one song you only need one
– Organ: MODE ORGAN button preserves the latest drawbars – and more customisations (e.g. organ-type)
Disdvantages of MODE buttons :
– a MODE button resets VR to ‘one manual with one sound’ (destroying splits or layers)
– a MODE button resets a couple of settings (customisations) to factory default
Notes:
– the limitations can be overcome by also using the ‘registration button’ for ‘patch switching’ (explained chapter III)
– V-Combo EDITOR gives more flexibilty for switching sounds by MODE buttons (e.g. assigning a synth sound also to MODE PIANO): see chapter IV
Overview: settings ‘preserved’ and ‘reset to factory default’
The following table shows which VR settings (parameters) are reset to ‘factory defaults’ and which preserve the current status when using MODE buttons:
(In chapter IIa we show how to ‘reduce’ the factory reset for Organ)
| MODE button | ||
| all (ORGAN PIANO SYNTH) |
|
|
| ORGAN |
|
|
| PIANO |
|
|
| SYNTH |
|
|
What does this mean? Examples:
- you change organ drawbars, then switch to MODE PIANO or SYNTH, then back to MODE ORGAN: organ will be at your previous drawbar setting
- you select a piano, e.g. ‘Honky Tonk’, then switch to MODE ORGAN, then back to MODE PIANO: piano ‘returns’ to ‘Honky Tonk’ (idem for synth sounds)
- you have selected a piano patch (e.g. ‘FM EP1’), then a synth patch (e.g. ‘Juno Str. 1’): use the MODE PIANO/SYNTH buttons to toggle between these two patches
- if you tuned a sound (e.g. synth lead with modified EFX, envelope/filter, etc), using a MODE button would reset these parameters to ‘factory default’: for this usecase see chapter III Example 2 ff
(IIa) Preparing VR Organ for MODE ORGAN button
Using MODE ORGAN to switch to organ has the big advantage of PRESERVING LATEST DRAWBARS – but also ‘limitations’ that cannot be ‘overcome’:
– Split: you cannot use organ in split (upper/lower, upper/bass)
– Rotary-Type: you must use the default Rotary-Type of Jazz or Rock organ
– EFX: you cannot use EFX like TWIN-ROTARY, TONE etc
All other ‘limitations’ shown in Chapter I can be more/less compensated
Voila the guide how to setup Organ for MODE button:
- switch to MODE ORGAN
- Organ-TYPE: select Rock or Jazz (or Transistor) – do NOT change Rotary type
- set your ‘base drawbar setting’
- Organ Level: do NOT use LEVEL-fader: instead use ‘Organ Low/High Gain’ (VR menu ‘Organ’)
Note: setting Low/High gain to same value (e.g. -5 / -5) works like ‘level’ - Overdrive: do NOT use OVERDRIVE knob: instead tune by ‘Drawbars’, ‘Organ Low/High Gain’ and ‘OD/dry’ (VR menu ‘EFX’)
- other EFX (e.g. TONE, MFX, etc): do NOT change
- tune Rotary (VR menu Rotary – see also Organ Tuning Guide for ‘authentic Leslie settings’)
- tune Organ (VR menu Organ : key click, leakage, etc)
- we repeat: do NOT change Rotary-type, OD-knob, and organ ‘Level’-fader
(IIb) Preparing VR Piano or Synth sound for MODE PIANO/SYNTH button
Using MODE PIANO/SYNTH has the advantage of switching to the latest used piano/synth – but also ‘limitations’ that cannot be ‘overcome’:
– Split: you cannot use piano/synth in splits or dual
– EFX, ADR, Filter, Octave shift, Portamento etc etc you cannot use any of those
Voila how to setup Piano or Synth for MODE button:
- switch to MODE PIANO / MODE SYNTH
- select a sound from VR PIANO section (Piano/EP/Clav/Other) / a sound from VR SYNTH section (Brass, Strings, …)
- do not customise the sound (no EFX, ADR, filter etc)
(III) Using the MODE buttons in VR registrations
We set up registrations as ‘initial setting’ for using the MODE buttons: loading a registration will initialise Organ, Piano and Synth, and MODE buttons can be used to toggle them
Example 1: using only MODE BUTTONS to toggle sounds in a song
Within a song, you want to toggle between “Organ”, “Piano/EP” and a “synth patch” by only using the MODE buttons:
prepare a ‘VR registration’:
- switch to MODE PIANO and select a patch from VR PIANO section (do not customise the sound)
- switch to MODE SYNTH and select a patch from VR SYNTH section (do not customise the sound)
- switch to MODE ORGAN and configure Organ as explained in Chapter IIa
- tune Reverb with REVERB knob and ‘Wall type’ (VR menu ‘EFX;) – do NOT change Reverb Type (‘Stage’)
- save to a VR Registration
Now after loading the registration use the MODE buttons to toggle sounds:
⇒ press MODE ORGAN to switch to the ‘customised’ organ while preserving the current drawbars
⇒ press MODE PIANO to switch to the ‘preselected’ piano patch
⇒ press MODE SYNTH to switch to the ‘preselected’ synth patch
Example of drawbars:
While paying organ you’ve pulled ‘all stops out’, then switched to MODE PIANO, then switch back to MODE ORGAN: it’s again ‘all stops out’
TIP: to return to the initial drawbar setting of the registration, press the registration button
Example 2: Using MODE BUTTONS AND the ‘registration button’:
You want to toggle between a “stock piano/EP” and a “customised synth-lead”:
- switch to MODE PIANO and select a piano/EP from VR PIANO section patch (do not customise the sound)
- switch to MODE SYNTH and select a synth-lead and customise it (EFX/MFX, ADR, cutoff/resonance etc etc etc)
- save to a VR Registration
Now after loading the registration use the MODE button AND the registration button to toggle sounds:
⇒ press MODE PIANO button to switch VR to the ‘preselected’ piano/EP patch (with factory defaults)
⇒ press the ‘registration button’ to switch to the customised synth-lead
Example 3: Using MODE BUTTONS AND the ‘registration button’ as a split (or layer)
You want to toggle between a “split with a Synth-pad (e.g. ‘strings’) in lower and Piano in upper manual” and a “Synth Lead”:
- switch to MODE SYNTH and select a lead from VR SYNTH section (do not customise the sound)
- create a split: set lower manual to the string patch and upper manual to a Grand
- save to registration
Now after loading the registration use the MODE SYNTH button AND the registration button to toggle sounds:
⇒ press MODE SYNTH button to switch to the ‘preselected’ synth lead (with factory defaults)
⇒ press the ‘registration button’ to switch to the split
NOTES:
– you can use it with splits in the following ‘combinations’:
| ‘split’ | MODE PAINO | MODE SYNTH |
|---|---|---|
| [U] synth [L] synth | piano | – |
| [U] synth [L] piano | piano | – |
| [U] piano [L] piano | – | synth |
| [U] piano [L] synth | – | synth |
– you can use it with layers in the following ‘combinations’:
| ‘layer’ | MODE PAINO | MODE SYNTH |
| [1] synth [2] synth | piano | – |
| [1] synth [2] piano | piano | – |
| [1] piano [2] piano | – | synth |
– ‘other combinations’ require V-Combo EDITOR (see next chapter)
– you can add MODE ORGAN
(IV) Using the MODE buttons with VR registrations and V-COMBO EDITOR
Registrations ‘for MODE buttons’ can also be prepared with the EDITOR – with much more freedom for selecting/combining sounds.
Let’s go deeper into the ‘understanding’ of “VR voices” and what happens when we use MODE buttons:
When we push:
– MODE PIANO button, VR switches to voice Upper-VCE
– MODE SYNTH button, VR switches to voice Upper-SYN1
When selecting sounds on VR keyboard, Upper-VCE is limited to patches from VR ‘PIANO’ section, and Upper-SYN1 is limited to patches from VR ‘SYNTH’ section
EDITOR allows to load ANY sound into those two voices, e.g. two SYNTH patches into Upper-VCE and Upper-SYN1: MODE PIANO/SYNTH buttons then toggle between synth A and synth B.
| MODE | Voice | possible sounds using ‘VR keyboard’ | possible sounds using EDITOR |
| PIANO | Upper-VCE | VR PIANO section | VR PIANO and SYNTH section |
| SYNTH | Upper-SYN1 | VR SYNTH section | VR PIANO and SYNTH section |
IMPORTANT: MODE buttons only work with VR ‘factory’ patches from PIANO or SYNTH section – NOT with hidden sounds (eXtra, Atelier, etc). To use hidden sounds, include the registration button into the ‘patch switching workflow’
Example 1: use the MODE button to toggle between 2 synth sounds
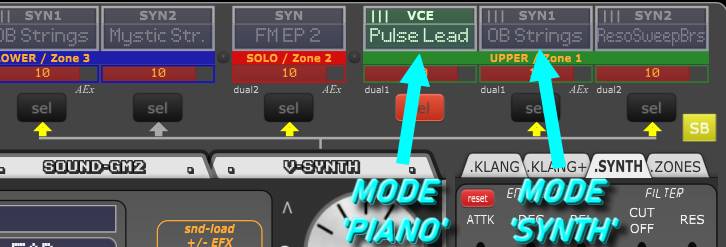
Upper VCE is ‘preloaded’ with ‘Pulse Lead’
Upper SYN1 is ‘preloaded’ with ‘OB Strings’
⇒ MODE PIANO button switches VR to ‘Pulse Lead’
⇒ MODE SYNTH button switches VR to ‘OB Strings’
Example 2: use MODE buttons with VR Registration buttons (1-4)
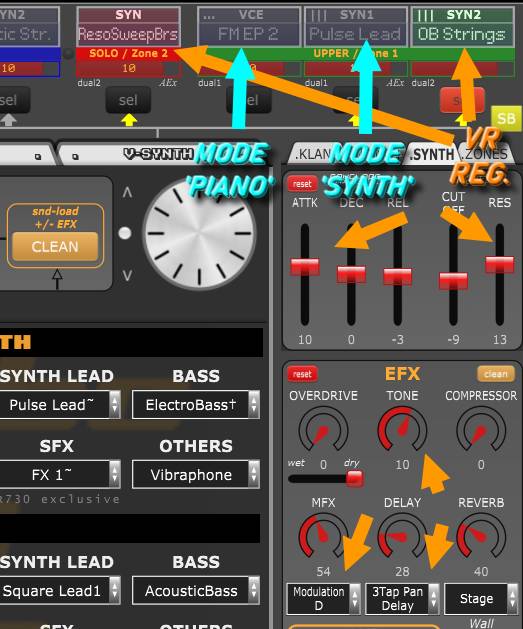
Upper VCE is ‘preloaded’ with ‘FM Piano’
Upper SYN1 is ‘preloaded’ with ‘Pulse Lead’.
Solo and SYN2 is a ‘layer’ with ‘ResoSweepBrass’ and ‘OB Strings’, with customised with EFX and envelope/filter
the ‘layer’ is saved as ‘the registration’
⇒ MODE PIANO button switches to FM Piano
⇒ MODE SYNTH button switches to Pulse Lead
⇒ VR-Registration button switches to “OB Strings + ResoSweepBrass” + custom EFX/ADR-CR
Example 3: use MODE buttons and the VR Registration button (1-4) and ‘hidden sounds’
While a voice that shall be used for a MODE button must be a VR factory sound, the ‘active voices’ of the registation itself can also be used with patches from eXtra and ATELIER !
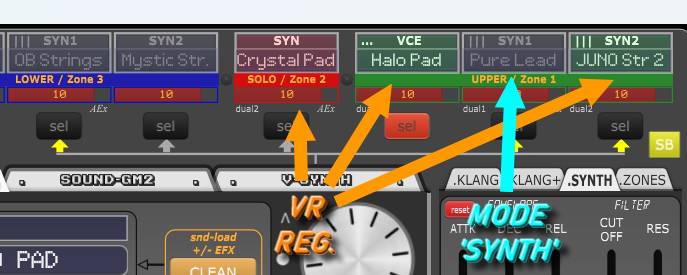
Upper-SYN1 is preloaded with moogisch ‘Pure Lead’ (VR factory patch)
‘the registration’ – Solo + Upper-VCE + Upper-SYN2 – is a multi-layer of ‘Crystal Pad’ (ATELIER), ‘Halo Pad’ (eXtra) and ‘Juno Str.’ (VR factory)
⇒ MODE SYNTH button switches VR to ‘Pure Lead’
⇒ VR Registration button switches VR to the multi-layer
Of course it’s also possible to combine ‘registrations as multizone’ (splits) with MODE patches.
(V) Remarks
- MODE buttons preserve VR seemsless transition (the latest sound is not cut off)
- ‘DRUM’ voice can also be ‘preload’ with a drumkit, e.g. TR-707, and saved to the registration
So when press the ‘DRUM’ button, VR switches to TR-707